Automatic Versioning of JavaScript Projects
How to create an automatic versioning system for JavaScript projects using Github Actions
- : Changing image and file paths
- : Changing picture and file paths
Introduction
As software projects become more complex, it becomes more and more useful to have a consistent way to version them. Of course, if you are creating a library or some other piece of software that other developers use, then it becomes indispensable! In this post, I will go through a way of:
- Ensuring useful and consistent commit messages using commitlint and husky
- Creating local versions using standard-version
- Setting up an automatic, language agnositc versioning solution using Github Actions
- Extending that solution to the case where you have a protected branch
If you’d like, you can view the finished project .
Setting up commitlint and husky
The first thing that we want to do when setting up our project to use a consistent versioning system is to ensure that our commits follow the conventional commit standard. This is a way of formatting our commit messages so that the purpose and what they accomplish is both immediately evident to any reader and, perhaps even more importantly for our goal of automatic versioning, easily parsed. The basic format is:
type(optional scope): short description

Extended body (optional)

Footer (optional)
The type can be one of about a dozen different keywords, and represent what sort of commit it is. For instance, you might use fix to denote that the commit is a bugfix or feat to denote that it is a feature. I would recommend taking a look at the above conventional commits website - they do an excellent job explaining the format quickly and concisely.
We could rely on ourselves (or the other developers that we are working with) to always use this type of commit, but even when working by myself I know that I can’t always be trusted. Thus, we will set up some tools to make this process automatic!
The first thing that we will do is to create a small sample project.
mkdir versioning-sample-project
cd versioning-sample-project
npm init
At that point npm will ask a series of questions; for our purposes the defaults are just fine. At this point you should have a small project with a simple package.json file and nothing else.
While we’re at it we might as well set this up as a git repository and commit our package.json:
git init
git commit -am 'Initial commit'
Great! Now we are all set up to install husky and commitlint. Husky is a package to make the use of pre-commit hooks easier, and commitlint is a linter for commit messages. We will use them together to ensure that our commits match the conventional commit format.
npm install --save-dev husky @commitlint/{cli,config-conventional}Now that we have commitlint installed, let’s configure it. The package itself is flexible enough to encompass a wide variety of linting rules, but for our purposes we just want the defaults. To get that working, we want to edit commitlint.config.js in the project source folder:
module.exports = {
	extends: ['@commitlint/config-conventional']
}
To test that this works, let’s try it with a good and bad commit message:
$ echo "Bad commit message" | $(npm bin)/commitlint
⧗   input: Bad commit message
✖   subject may not be empty [subject-empty]
✖   type may not be empty [type-empty]

✖   found 2 problems, 0 warnings
ⓘ   Get help: https://github.com/conventional-changelog/commitlint/#what-is-commitlint
echo "fix: good commit message" | $(npm bin)/commitlintNote that when you run the command on a good commit message, there is no output; that means that the check passed!
Now let’s set it up with husky so that it works automatically:
npx husky install
npx husky add .husky/commit-msg 'npx --no -- commitlint --edit "$1"'
Once that is done, your commit messages will be linted before the commit is finished. Let’s try to add all of our recent changes and see what happens:
git add .
git commit -m 'Updated some things'
The result should be the same error message as before! If you absolutely need to create a commit that doesn’t follow the specified format, you can always pass the --no-verify flag when creating your commit message.
Now let’s try it again with a conforming commit message:
git commit -m 'feat: added automatic commit message linting'This time it worked!
Setting up a local versioning system
While the ability to ensure a consistent commit message standard is great, so far we haven’t made any real progress toward our actual goal of creating automatic versions for our project. Let’s remedy that by creating a command that we can run locally to create a new version!
In this space, there are really two main contenders: standard-version and semantic-release. They are both roughly comparable; the major difference between them is that semantic-release is more geared toward people whose project will be published on npm or other such systems. Indeed, (at least as of the time of writing), you could not finish the setup for semantic-release without npm credentials. Since our versioning system will be more applicable to non-library pieces of software, we’ll use standard-version.
First let’s install it:
npm install --save-dev standard-versionNow we want to create a release command in our package.json:
"scripts": {
	"release": "standard-version"
}
Since this will be our first release, we want to have standard-version set up everything that it needs.
$ npm run release -- --first-release
> versioning-sample-project@1.0.0 release
> standard-version "--first-release"

✖ skip version bump on first release
✔ created CHANGELOG.md
✔ outputting changes to CHANGELOG.md
✔ committing CHANGELOG.md
✔ tagging release v1.0.0
ℹ Run `git push --follow-tags origin master` to publish
As you can see from the output, this creates the changelog and a git tag with the version, but doesn’t actually change it. For that, we need a commit in the standard format.
So, let’s say that we are working on a cool new feature in the project. Let’s create it, commit it, and create a new release.
echo "Cool new feature" >> featureFile
git add .
git commit -m 'feat: added a cool new feature'
npm run release
Then you should see the following output.
> versioning-sample-project@1.0.0 release
> standard-version

✔ bumping version in package.json from 1.0.0 to 1.1.0
✔ bumping version in package-lock.json from 1.0.0 to 1.1.0
✔ outputting changes to CHANGELOG.md
✔ committing package-lock.json and package.json and CHANGELOG.md
✔ tagging release v1.1.0
ℹ Run `git push --follow-tags origin master && npm publish` to publish
And now take a look at CHANGELOG.md!
# Changelog

All notable changes to this project will be documented in this file. See [standard-version](https://github.com/conventional-changelog/standard-version) for commit guidelines.

## [1.1.0](///compare/v1.0.0...v1.1.0) (2021-12-07)


### Features

* added a cool new feature e7eb637

## 1.0.0 (2021-12-07)


### Features

* added automatic commit message linting 47a0b07
First of all, it’s great the we can see exactly what changes (and of what type!) occurred during each version change. Notice as well that standard-version used our commits to create the changelog - if we had included a body to the commit, that would have appeared here as well.
So far we are doing pretty well - we have a versioning system up and running. However, it would be really nice if this versioning would be something that we could take care of as part of our CI/CD pipeline. First of all, it is more convenient. Secondly, and perhaps more importantly, you could easily imagine that in a project with multiple contributors, ensuring that everyone remembers to update the version before merging in any changes, and that those locally-updated versions don’t conflict with each other, could quickly become problematic! To solve both of these, let’s set up a Github Action to do all of this for us.
Setting up a versioning system on Github Actions
Github Actions is a CI/CD tool that Github has made available to users of Github (even free users!). To set our project up with an automatic versioning action, we need to create the ./github/workflows/versioning.yml file.
name: Semantic versioning

on:
    push:
        branches:
            - development

jobs:
    semantic-versioning:
        runs-on: ubuntu-latest
        steps:
            - name: checkout
              uses: actions/checkout@v2
              with:
                  fetch-depth: 0 # gives access to all previous commits
            - uses: actions/setup-node@v1
              with:
                  node-version: "16"
            - name: Update version
              run: |
                  git config --local user.email "41898282+github-actions[bot]@users.noreply.github.com"
                  git config --local user.name "github-actions[bot]"
                  npx standard-version
            - name: Push changes
              uses: ad-m/github-push-action@master
              with:
                  github_token: ${{ secrets.GITHUB_TOKEN   }}
                  branch: ${{ github.ref   }}
There’s a lot going on here, so let’s take a look at some of the steps in more detail.
on:
    push:
        branches:
            - development
This controls when the action should run. This is my personal preference, but I like the development branch to be the main one, so for versioning this sets it so that the action will run whenever I push (or merge changes) into development. Ideally that should be where most of the work happens before merging it into main.
- name: checkout
  uses: actions/checkout@v2
  with:
	  fetch-depth: 0 # gives access to all previous commits
This action checks out the current repository to the server running the action. Setting the depth to 0 is critical - since standard-version uses the commits to create the new version, it needs access to them! Without this line standard-version will consistently fail to find any changes.
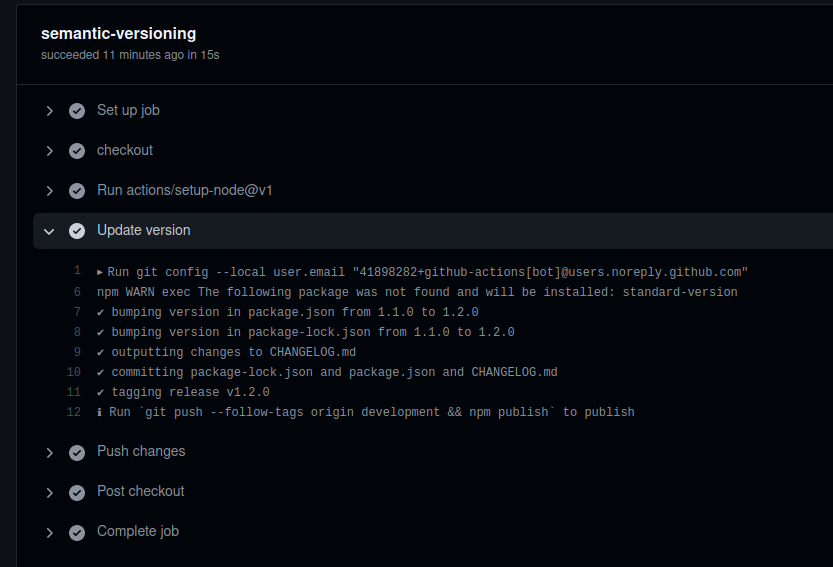
- name: Update version
  run: |
	  git config --local user.email "41898282+github-actions[bot]@users.noreply.github.com"
	  git config --local user.name "github-actions[bot]"
	  npx standard-version
The first two lines set the current user a a Github Actions bot; this helps to keep track of commits that an actual developer has made as opposed to ones done automatically. The last line is where the work happens: npx is used to run standard-version on the branch.
- name: Push changes
  uses: ad-m/github-push-action@master
  with:
	  github_token: ${{ secrets.GITHUB_TOKEN   }}
	  branch: ${{ github.ref   }}
This pushes the changes (including our new versioning!).
Now that we have the file, let’s see how it runs! Remember that you will need to be on the development branch (or open a pull request and merge into development)
git add .
git commit -m 'feat: added automatic versioning with github actions'
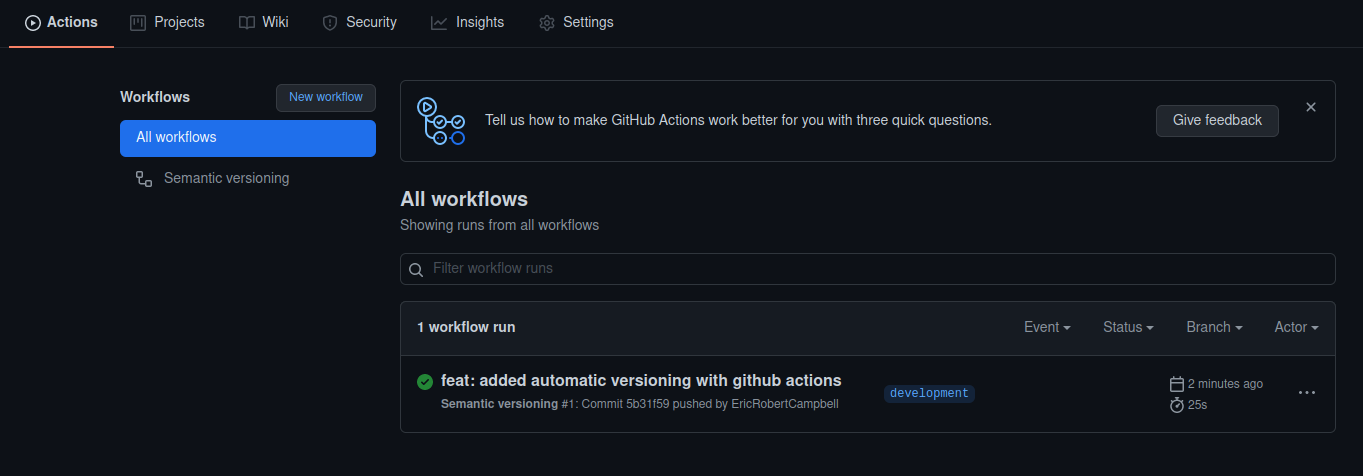
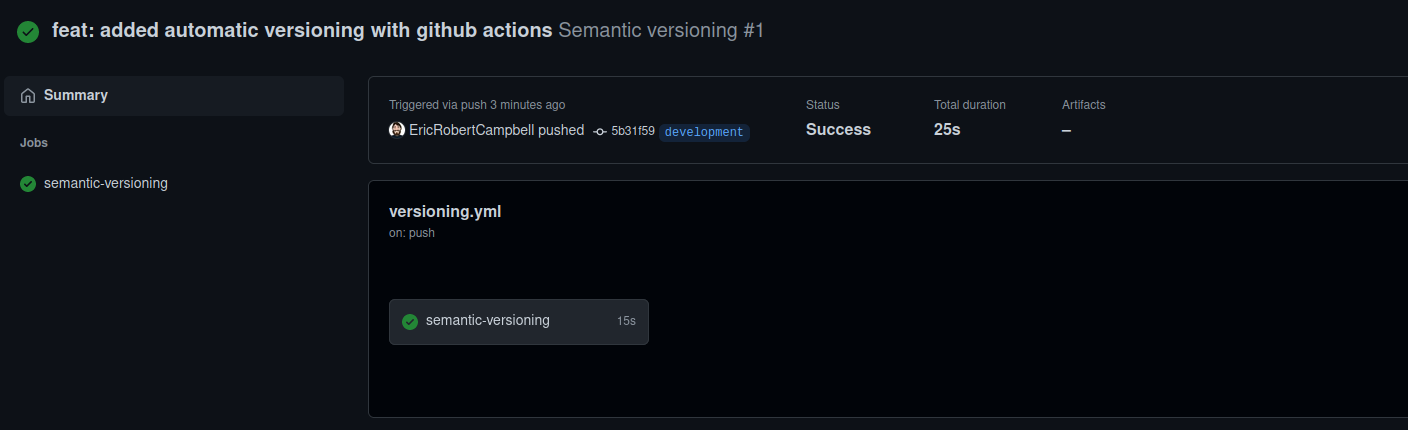
git pushIf you now go to Github, you should be able to see that the Action ran successfully. Note how there is a new contributor - the Github Actions bot that we set up to push the changes!

Dealing with protected branches
This version of our system works great! Unfortunately, it has a fairly significant downside - it won’t work if development is a protected branch. It is extremely common to protect the key branches in your project in some way, generally restricting the people who can contribute directly to them, ensuring that some criteria are satisfied (tests passing, &c.), or just ensuring that every change is made via a pull request. Let’s see how we can modify our existing system to work when development is protected in a very specific way - only allowing changes to be made via a pull request.
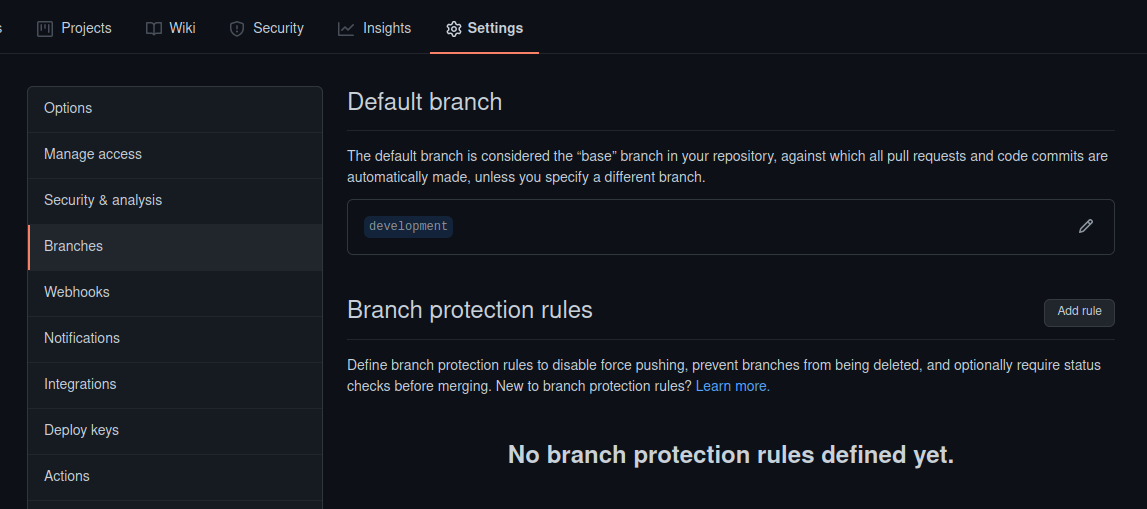
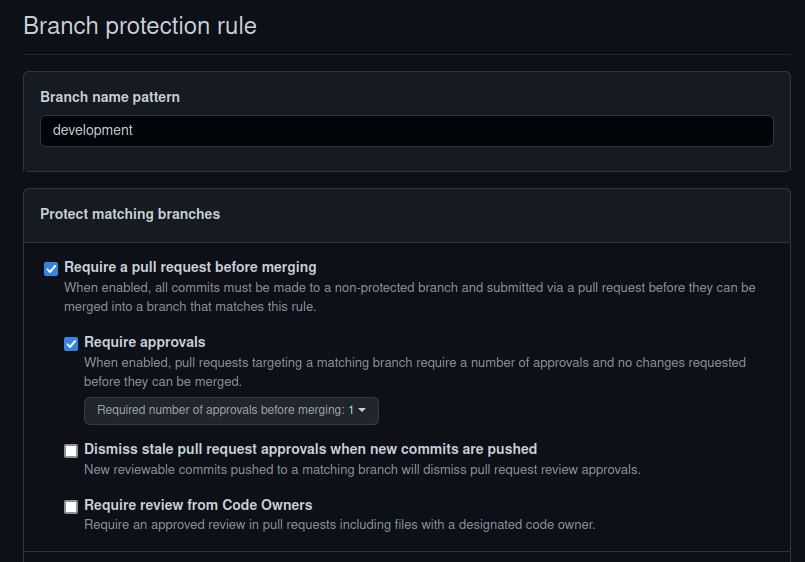
First, let’s protect this branch. On Github, go to Settings > Branches and add a branch protection rule. Make sure that the “Branch name pattern” (right at the top) is set to ‘development’.
Let’s just add the “Require a Pull Request before merging” and within that, “Require approvals” protections. A little further down you’ll see “Include administrators” - you must ensure that this is not checked!
Now let’s see what happens. Let’s try pushing a commit up to our development branch:
echo "another feature" >> featureFile
git add .
git commit -m 'feat: added another one'
git push
Note that you might need to git pull before all of that - remember that the upstream version of development has the new versioning changes that our new action performed!
Now take a look at the Actions tab in Github. It’s a disaster!

The action itself failed.
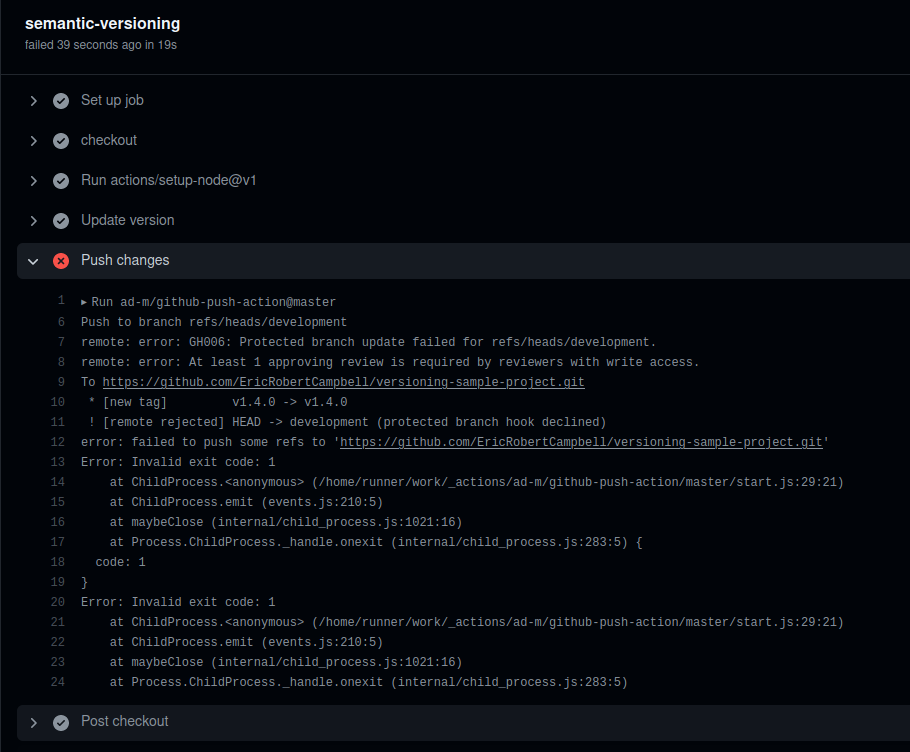
Looking in more detail, it looks like the versioning worked, it was just the final push back to development that failed.

Looking even closer, we can see the issue - we just protected our branch so that it required a passing review, and that obviously didn’t happen.
Here’s where the fact that we left the “Include administrators” blank becomes important. In order to circumvent this protection, we are going to create a Personal Access Token (PAT) and use that instead of the default GITHUB_TOKEN in the action. We’ll also need to make a few changes to the action workflow itself, but we’ll get to that later.
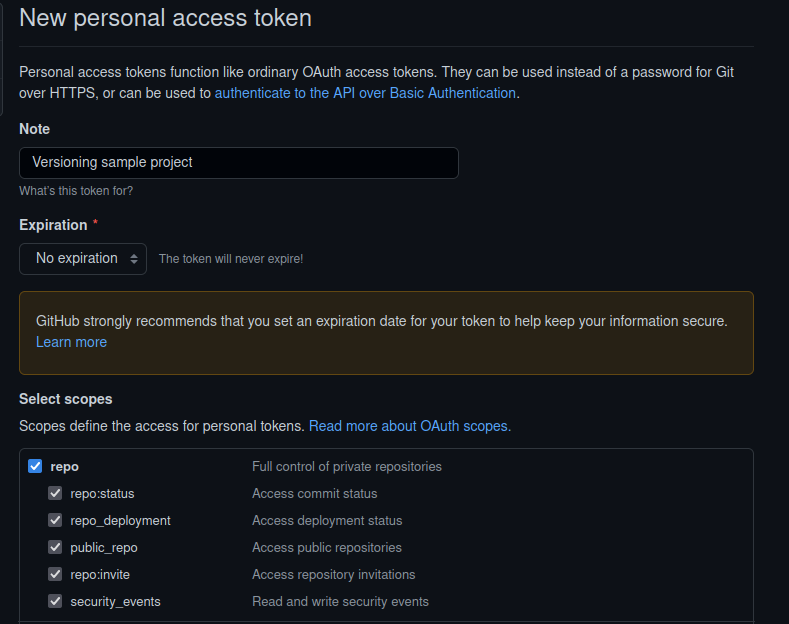
First, we’ll need to create a PAT. As the name suggests, rather than being bound to a specific repository (as is the GITHUB_TOKEN we are currently using), this token is bound to, and has the same permissions as, the user who creates it. On Github, click on your avatar, then go to Settings > Developer settings > Personal access tokens, and click on Generate new token. Fill in a name to remind yourself of what it is for, then select an expiry time (you probably shouldn’t do what I am in the screenshot and set a definite expiry instead), and select the “repo” scope for the token. Then click ‘Generate token’ and be sure to save the result!
Now we need to add that token as a secret in our repository. In the repository itself, go to Settings > Secrets and add a new repository secret. Make sure to name it something memorable (I chose VERSIONING_TOKEN) and have as its value the PAT you just generated. From now on you can access it as part of actions with ${{secrets.VERSIONING_TOKEN}}.
However, it’s not quote as easy as just swapping in the new token. Let’s see how we need to change the workflow versioning.yml.
@@ -4,6 +4,10 @@
     push:
         branches:
             - development
+        paths-ignore:
+            - package.json
+            - package-lock.json
+            - CHANGELOG.md

 jobs:
     semantic-versioning:
@@ -13,6 +17,7 @@
               uses: actions/checkout@v2
               with:
                   fetch-depth: 0 # gives access to all previous commits
+                  token: ${{ secrets.VERSIONING_TOKEN }}
             - uses: actions/setup-node@v1
               with:
                   node-version: "16"
@@ -24,5 +29,5 @@
             - name: Push changes
               uses: ad-m/github-push-action@master
               with:
-                  github_token: ${{ secrets.GITHUB_TOKEN   }}
+                  github_token: ${{ secrets.VERSIONING_TOKEN }}
                   branch: ${{ github.ref   }}
In addition to swapping out the Github token for our PAT, we also need to ignore some of the files in our branch. In fact, the ones that we need to ignore are exactly the ones that are affected by the versioning command! The reason for this is simple - we don’t want an infinite loop of actions. Without those lines, the push which we do as part of our action will itself trigger the action (since it is triggered on push), which will then trigger it again, which will…
The reason that we didn’t need that when we were using the Github token is that by default, actions performed using that token don’t themselves trigger other actions. That is not the case with out PAT, and so we need to ignore the changes that occur during the versioning. It does mean that if you for some reason have a merge that involves only those files that the action will fail to run, but a change involving just those three would probably not warrant its own version anyway.
Now let’s try it again! Before we do, there is one thing to do first. The last failed update actually failed after the version was created, including the tag for it. If we try to push again, we will have a conflict. Let’t delete that tag first:
git push --delete origin v1.4.0(Note: the exact tag name may be different on your project. Just look for the most recently created one).
Now we can push it:
git add .
git commit -m 'feat: versioning now works on a protected branch'
git push
And there we have it! A successful push to a protected branch.
Conclusion
Having a consistent, expressive, and useful versioning system is incredibly important as software projects become larger and more things, whether customers or other projects, begin to depend on them. Above, we’ve created a versioning system which fulfills all of these. It is easy to use, requiring no active work once the setup is done, and maintains the existing security of the branches.
I hope that you found this useful, and good luck!